How to Grow Shiitake Mushrooms on Logs at Home
Can't get enough mushrooms? Forester and author Kevin Zobrist shares how to grow Shiitake mushrooms right in your backyard.

Episode Description
In this episode of The Evergreen Thumb, guest Kevin Zobrist joins host Erin Hoover to talk about how to grow shiitake mushrooms right in your backyard. Kevin starts the episode by explaining just how easy it is to cultivate your own mushrooms. He gives listeners an intro to growing mushrooms and explains why growing Shiitake mushrooms is worth it.
Kevin explains how to prepare logs for inoculation and then explains the mushroom inoculation process. He tells listeners about two main types of available mushroom spawn and how to use them. He explains what kind of wax a person should use for this process, and what NOT to use. Kevin gives ideas for techniques for soaking logs and shares useful ways to keep pests off your mushroom logs. He gives an overview of what tools to use in this process and explains common challenges that growers might come across and how to deal with them.
He wraps up the episode with links to resources for anyone who wants to get started growing their own mushrooms.
Kevin is a professor with Washington State University, where he has been a faculty member since 2007. Before that he was a research scientist at the University of Washington. Kevin is based in Snohomish County and coordinates the Extension Forestry program in five Puget Sound area counties, working with people who own forested property. Kevin has two forestry degrees from the University of Washington. His research interests include forestry education, forest health and ecology, and native trees. Kevin is also a Certified Forester and author of the book Native Trees of Western Washington.
Listen Now to How to Grow Shiitake Mushrooms

Resources
- Instagram (@wsuforestry)
- https://www.facebook.com/wsuforestry
- The Forest Overstory Podcast
- Farming Mushrooms in the Forest: An Opportunity to Grow Something New
- Pacific Northwest Forest-Cultivated Mushroom Growers Network
- Native Trees of Western Washington: A Photographic Guide
- Plug Spawn for Logs & Stumps
- Mushroom Growing Kits
- Tool Guide for Cultivating Mushrooms on Logs
- Mushroom Growing Tools: Drill Bits, Adapters, Inoculators

Transcript
[00:00:00] Erin Hoover: Welcome to The Evergreen Thumb, your go-to podcast for up-to-date research-based horticulture and environmental stewardship knowledge to help you grow and manage your garden, produced by Washington State University Extension Master Gardener volunteers and brought to you by the Master Gardener Foundation of Washington State.
I’m your host, Erin Hoover, a WSU Extension Master Gardener since 2015 and a certified permaculture designer and modern homesteader.
WSU Master Gardener Volunteers are university-trained community educators who have been cultivating plants, people, and communities since 1973. Are you ready to grow?
Let’s dig into today’s episode.
Welcome to The Evergreen Thumb, episode 32. My guest today is Kevin Zobrist. Kevin is a professor with Washington State University, where he has been a faculty member since 2007. Before that, he was a research scientist at the University of Washington. He is currently based in Snohomish County and coordinates the Extension Forestry Program for five Puget Sound area counties working with people who own forested property.
Kevin has two forestry degrees from the University of Washington, and his research interests include forestry education, forest health and ecology, and native trees. He is also a certified forester and author of the book Native Trees of Western Washington.
Kevin, thank you for joining me today. Welcome to the show.
[00:01:28] Kevin Zobrist: Oh, it’s my pleasure. Thanks for having me.
[00:01:30] Erin Hoover: So can you tell us a little bit about yourself and the work that you do for extension?
[00:01:35] Kevin Zobrist: Sure. Well, I am a professor and Extension Forester with WSU. I serve the greater Seattle area mostly, and I provide programming and other educational resources and technical assistance to people who own forested property around the area and there we have many thousands of small forest landowners in Seattle, the Puget Sound area and throughout the state.
[00:02:05] Erin Hoover: Okay. So what is considered a small forest?
[00:02:09] Kevin Zobrist: Uh, how small is small? Well, it can range. Our clientele probably ranges from less than an acre, all the way to over a thousand acres. So it’s a broad range.
[00:02:20] Erin Hoover: So you’re here today to talk to us about growing Shiitake mushrooms.
What makes Shiitake mushrooms a good choice for growing at home?
Why Grow Shiitake Mushrooms?
[00:02:29] Kevin Zobrist: Shiitake mushrooms. They’re really easy to grow.
Uh, anyone can do it. I like to say it’s so easy. Even I can do it. They’re pretty reliable growing system. And of course, Shiitake are delicious. They’re highly prized for culinary uses and medicinal uses.
And so forth, and it’s just a really fun hobby.
An Intro to Growing Shiitake Mushrooms
[00:02:52] Erin Hoover: Alright, so let’s start with the basics. How do you grow Shiitake mushrooms?
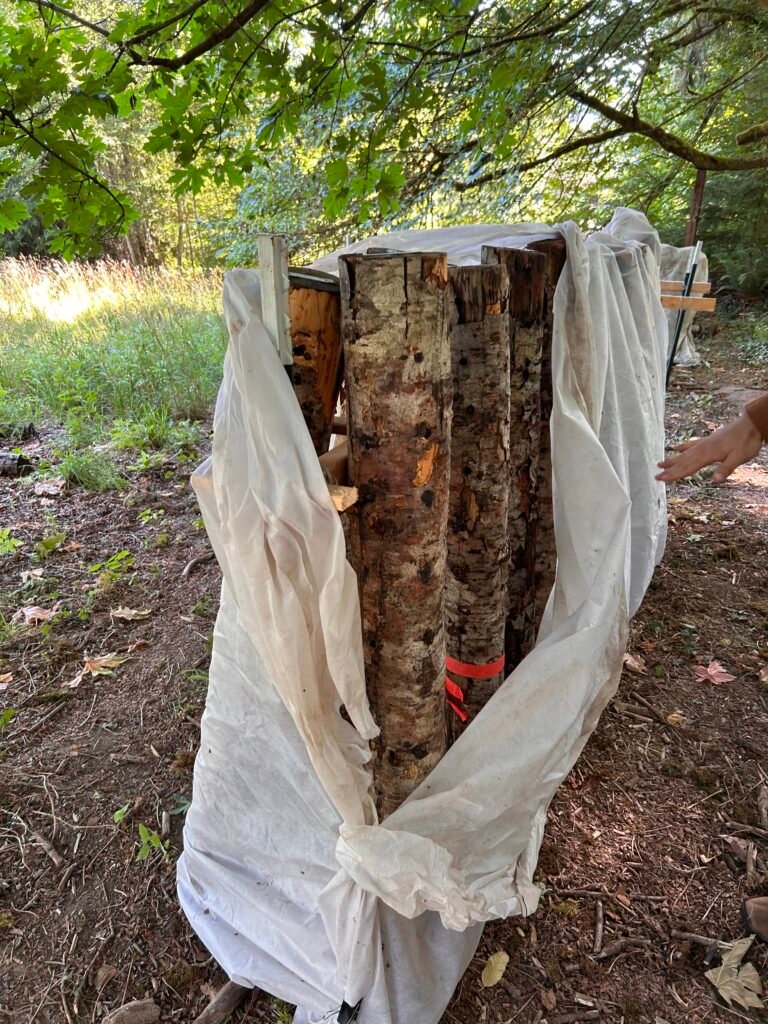
[00:02:56] Kevin Zobrist: So we grow them on logs. Specifically on hardwood logs. And the hardwoods, those are the broadleaf trees. We have several options here in the Pacific Northwest. We recommend alder mostly.
Alder is very readily colonized by Shiitake mushrooms. It works really well. It’s reliable. You can also grow it on oak. So in Asia, Japan, and China, where these growing systems come from, I think oak is the most commonly used there.
Shiitake actually means chinkapin fungus. Because long ago it was grown on chinkapin trees, so it’s Japanese for chinkapin fungus, but you can grow it on ash, cherry, cottonwood in a pinch, birch.
I think alder and birch and oak are probably the species we have the most success with in terms of a substrate. What you want is a freshly cut, you don’t want something that has been dead or started to decay process already as that will have already been colonized by just our natural saprophytic fungi that contributed to natural decay processes in the environment.
Preparing Logs for Shiitake Mushroom Inoculation
So we want to get a jumpstart with a Shiitake before our native decay fungi get in there. I tell people to think of growing Shiitake mushrooms, you know, cause we kind of have to get out of that plant-growing paradigm. Since fungi are so different and don’t be able to consider it as controlled decomposition.
You know, when you have a dead piece of wood, fungi are going to decompose that. We want to control it so that it’s a fungus that produces a fruit that we want, that is the fungus that decomposes that log. So we’re trying to control it so that the Shiitake fungus is going to be the fungus that decomposes that log and it’s going to produce fruit for us as it does that.
So freshly cut logs, and you want to cut them in the winter when the tree is dormant. I like to do it late February. The reason we want to do it in the cold season when it’s dormant is the wood is going to be moist and also the bark is going to be firmly attached and it’s really important for success to have intact bark.
You don’t want chunks falling off or slipping because then you just end up with excessive moisture loss from the log as well as potential entry points for other fungi. When you get into the later spring, when things start actively growing, the sap’s running and so forth, that’s when the bark can get really loose.
So late February is great. And then you’re going to want to wait for three to six weeks. I think three weeks is probably adequate just for those natural tree defense chemicals to dissipate that could inhibit colonization by fungi.
So we cut them, we let those lie for a few weeks, and then we are ready for the inoculation process.
Now another common question is, what size of logs do we want to do with this? Four to six inches in diameter is, I think, ideal. You don’t get much of a benefit by going larger than six inches, and it does take more inoculum, more time to inoculate, and then also more time for the fungus to colonize before you can fruit that.
[00:07:00] And anything below four inches, it dries out much more readily, and will not produce as much or as long. So alder trees are perfect. You get a young alder, easy to find ones that are, are going to give you some log segments, which are called bolts, that are just the right size for inoculation. As far as length, we usually do it about four-foot lengths.
Those are easy to manage, easy to handle. When you start getting longer then that, they get unwieldy and heavy, difficult to transport and work with for the various processes that you’re going to need to employ to grow your mushrooms.
[00:07:37] Erin Hoover: Okay. What about short? I mean, you can, can you go shorter without worrying about drying out too much?
[00:07:43] Kevin Zobrist: You could go shorter. Uh, you’re inoculating a bunch more logs, and you’re not going to get as much production off of that. And I don’t, I don’t think there’s a problem with that per se. You’re just not going to get a lot of mushrooms per log. If they’re going to be spread out, when they flush out, they’re going to be spread out along the length of that, of that bolt.
[00:08:04] Erin Hoover: Okay. So then based on my math, which doing math on the fly is not my strong suit, but, so we’re looking at like a April-ish to inoculate early spring.
[00:08:19] Kevin Zobrist: Yeah. Early spring. I like to cut in late February and then inoculate kind of in late March. Oh, when we’re kind of past the frost period.
The Shiitake Mushroom Inoculation Process
[00:08:31] Erin Hoover: What is the inoculation process and are there special tools that you need?
[00:08:35] Kevin Zobrist: Uh, there are special tools and one of the great things about growing mushrooms as a hobbyist is that the tools are not expensive. So it’s a very accessible hobby that doesn’t require a huge financial investment.
[00:09:00] So the first thing that we are going to do is we are going to drill holes in the logs. The holes are going to be about two to four inches apart for down the length of the log.
Then we rotate the log and we want about two to three inches per row, and then we do an offset roll of holes. In other words, the next row, the hole will fall in the middle between the holes above. We continue to do those alternating offset rolls. It creates kind of a diamond pattern as we rotate the log and get all our rows.
And we have resources for hobbyists of how to calculate how many rows you need, how to mark the log to make it easy to drill out those rows with the right spacing and so forth. It’s not critical to be exact. We just want to get a nice, good distribution of holes.
Two Types of Mushroom Spawn
[00:10:00] Now there are two types of spawn, and the spawn is what we inoculate into the log to get that fungus growing in that log.
So these are substances that have been exposed to spores of the fungus, and then mycelium, which is the vegetative part of the fungus, has started growing these mediums. Fungi can reproduce and grow from a process called fragmentation, which means if you take a fragment of mycelium and put it in an appropriate substrate, it’s going to start growing.
There are two primary types of spawn. Plug spawn, and those are little wooden dowels that are about an inch long and a quarter inch in diameter, and for those you would use a 5/16th drill bit to drill your holes and then you take a hammer or a mallet and tap those into the hole until they’re flush. That’s how I used to do it.
[00:11:00] But I now use sawdust spawn because we have found that that works better. It’s more reliable and I actually find it easier to do. I like working with sawdust a lot. I was kind of intimidated at first like I haven’t done that. Plugs are just self-contained and easy, you just tap them in, but I really like working with sawdust and that’s what we are teaching in our mushroom workshops, is using sawdust.
So it’ll come in a bag, kind of this big brick of sawdust, compressed sawdust that’s got, you’ll see the white mycelium running through all of it. And you’ll take it out, you’ll break it up, put it in a tray, and there are special inoculator tools, and they’re hollow at the tip, and so you kind of pound that tip into your pile of sawdust spawn, and that, that hole, that cavity there will fill.
[00:12:00] And then it’s got a plunger. So you put it up to the hole and you depress the plunger and that pushes it into the hole that you’ve drilled. Now for the sawdust spawn, we drill a little bit of a wider hole. Uh, so that’s, I want to say like a 12-millimeter bit that we use for that. You can do this with just a handheld drill, but we have found that it’s much easier to do it with an angle grinder.
The RPMs are so much faster with the angle grinder and much less fatigue on your hand and arm. I can drill a log probably 10 times faster with an angle grinder than I can with a handheld drill. And we use specialized bits for that. So instead of attaching a grinding wheel to your grinder, there’s a special adapter that you can get from a mushroom supply company, and then a specialized bit that’s the right width.
It really, it’s not going to look like your standard drill bit. It’s got a really sharp tooth on it that really chews out that whole fast. And it also has a stop collar on it. So you just plunge it in until it hits the stop collar, and you’ve got just the right depth and so forth. These adapters and an angle grinder, again, these are not expensive tools and supplies to get.
So you’ve stuffed all your holes with your sawdust spawn and now you have to seal those holes. We do this with wax. We want to get something that is food grade, because remember this is going to come in contact with mushrooms that you’re going to eat. So people ask, well, can I put latex paint or tar over it?
Wax for Sealing Mushroom Spawn into Logs
[00:14:00] No, if you wouldn’t eat it, don’t use it to seal your mushroom holes.
So things like cheese wax, I think works particularly well. You can use soy wax as another one that I use commonly. These are available. They’re very inexpensive. You can get a big block of it. It melts easy, easily and so forth. We have to melt that wax.
There are a variety of different ways you can do that. You could use like a double boiler so that you don’t want to burn the wax. You don’t want it to start to smoke when it gets to its smoke point, little, uh, electric kettle type of thing. That’s, you know, like one of those little CrockPot-looking things.
[00:15:00] I like to find ones that have a temperature control dial that has actual temperature gradients on it, not just the low medium high, but we want to heat that, uh, the right temperature, which I think is somewhere in the, remember off the top of my head, but in the 200–250 degree range, uh, get that fully heated.
And without we can hold that temperature then without it starting to smoke. And then we’re going to have to apply that wax. So we take, you can use just a simple paintbrush to dip it in the melted wax and dab it on those holes, and it will cool and solidify very quickly.
They have really specialized tools. I have one that I got from Japan that’s a specific tool designed for wax daubing. It was about $200. It’s a very expensive tool compared to what we would otherwise use for this.
Unless you’re really into it and want to get your hoity toity tool, you can just use simple things like paintbrushes. I think that paintbrushes can get a little gummy when you’re doing it and can inhibit just the nice, smooth flow of the wax so that you get a nice seal. I also, I’m not real big on the foam brushes because that foam can melt in the hot wax.
[00:16:00] What my favorite tool is, is a silicon baster brush. You know, these are like $5 to $10 from the grocery store. Because they’re silicon, you don’t have to worry about the melting and stuff doesn’t stick to them.
So when you’re doing it and the wax kind of starts to build up and cool a little bit on the brush with your paintbrush, it just becomes kind of a gummy mess. With the silicon brush, you can just rub your hand over it, shake out all of those wax bits. They just fall off really easily and you’re ready to go again.
So really cheap, really effective. The wax flows nicely off of those silicon brush tips there. So that’s what I use for mine.
[00:17:00] Once you have sealed all your holes, then you wait.
Really, I think the three most important ingredients to growing mushrooms are time, moisture, and patience. This is not an instant gratification endeavor.
Selecting a Location for Colonizing Your Mushroom Log
It’s gonna have to sit for a year before we can look at actually producing the fruit. That year is called the spawn run. That’s the time that it takes for that mycelium that you’ve inoculated directly into the log to start to spread and then fully colonize that log. During that year is critical that the logs stay moist.
[00:18:00] The log dries out that will kill the fungus, and you no longer have a viable mushroom log. So where are you going to store these? Around your house in your woods, your garden is someplace where it’s going to be in shade. You don’t want these logs to be exposed to direct sunlight.
So when I did it, I had, you know, small house in the suburbs and I just put them right up against the north side of the house.
That worked really well as a spot for me to keep those. You want them exposed to the elements, exposed to the rain. So they get that natural moisture. So it’s not something that you want to put under an overhang for shade or something like that. It needs to be in a shaded area. That’s still going to get exposure to rainwater.
Techniques for Soaking Shiitake Mushroom Logs
One of the things that WSU researchers who have been doing trials on this over the past couple of years have found is that that first summer, so let’s say you inoculated in late March, early April, come June or July when things are starting to get warm, soak that log for 24 hours, in some sort of vessel of cold water.
[00:19:00] That sort of kind of recharges the moisture in the log. Then it should stay fairly moist throughout the summer. So we stack these in crib stacks. So you have a row of logs all facing one direction. Then you have a row on top of those facing 90 degrees and alternate that.
You can cover these stacks in an agricultural fabric like reemay, something that’s breathable and is going to let some moisture through, but it’s also going to help retain moisture as well during the summer. So that might be a helpful thing to help keep your logs moist. Once your year is up, so you’re getting towards now the May of your second year, then you can start to think about fruiting.
[00:20:00] This is going to require again, a good soaking. So something to plan in advance is what are you going to soak your logs in for serious mushroom growers? You’re probably going to want to get a big stock tank, you know, something that’s going to hold a good. dozen logs or so. And that’s probably going to be the most expensive piece of equipment you’re going to have.
You know, that’s going to set you back a few hundred dollars to get a big galvanized, you know, one of those big, galvanized steel stock tanks. If you’re really doing small scale, uh, you could use your bathtub. If your family will let you just make sure to clean up well afterwards. I’ve used a little concrete mixing tub and just, you know, some people use like one of those little round kiddie pools that you fill with the hose, toss those in there.
[00:21:00] The logs are going to be buoyant. So when you’re trying to charge it with moisture that first year during the spawn run, and when you’re soaking it to try and initiate fruiting that second year, you’re going to have to have something to weigh those down. With stock tanks, they have a little lip on them, and we cut like two by fours to length and just wedge them just under that lip to hold the logs down.
For my little micro-operation, I use cinderblock bricks to just hold them down in a simple tub of water. And so forth. People can use their creativity and ingenuity just need to make sure those logs get. submerged. What the soaking does is it kind of shocks the fungus, makes it think that the season has suddenly changed and that it’s time to fruit.
You’re doing this in cold water because there has to be a sharp contrast between what the air temperature has been. and the water temperature. So sudden temperature shift, we soak that overnight and then we wait and hopefully in one to two weeks we start seeing production. Now while we’re fruiting, we don’t put those back on the crib stacks.
Structures for Fruiting Shiitake Mushroom Logs
[00:22:00] We need space for those mushrooms to flush out. So we usually do these in an A-frame type of structure. So just creating a, uh, an A-frame structure with a long beam, and then you lean those logs at like a 45-degree angle up against that beam. There’s one end on the ground and then the top is resting against that beam.
So they’re all upright on either side of that. You can put down a landscape or Remay fabric underneath the bottom, so they’re not in soil contact. You don’t have that to worry about. And during this time, you also have to worry about pests. You can get rodents getting in there, eating, you’re growing mushrooms and so forth.
[00:23:00] But I think the two biggest pests that we’ve run into are slugs and sow bugs, data bugs. So we’ll take our A-frame and we’ll have the fabric laid out underneath. Usually on the, on the very bottom, we’ll put a landscape fabric. A part of that is we don’t want mycelium to start to grow through that into the ground.
On top of that, we have the bottom of our Remay, and then we pull up that Remay and wrap it, like wrap the whole thing, like a big present and use like binder clips to tightly close off the cloth all around the edges so you have a somewhat sealed environment, and that’s what’s going to keep your pests out while your logs are fruiting.
And then you watch, and you wait, and hopefully you get some fruit. Lots of it. Now if it doesn’t fruit your first time, don’t panic. You know, two weeks have gone by and you got nothing. Uh, the logs just aren’t ready. Maybe they need a longer spawn run. You can try again later in the season, give it a whole other year or so forth.
[00:24:00] My first time doing this, I followed all the directions, got it out there, soaked it, had it all set up, ready to fruit and one to two weeks and I got nothing. I just thought, okay, I’ll, I’ll give it a rest, put them back on the stack. And then a week or two later, I round the corner to that side of the house, and those logs are just covered in mushrooms.
Uh, so the moral of the story is I was trying too hard. Don’t try too hard on this.
Indications that Your Shiitake Mushroom Logs are Viable
[00:24:22] Erin Hoover: So when you’re waiting for that fruiting, are there any indications in the spawn or that it’s still viable or, uh, is it just hope?
[00:24:33] Kevin Zobrist: Oh, is it, there’s a lot of hope that goes into that.
[00:25:00] Uh, I think that as long as you have kept your logs moist and out of the sun, there’s a pretty good chance you have a viable log, and you can also sometimes see on the end, it’ll have this kind of dark mottled appearance on the end where you can see kind of the colonization patterns of decay there in that log.
So that’s another indicator, that you can look at and we have resources for hobbyists who can look at photos of what this is supposed to look like and so forth that people can follow along with if it doesn’t fruit that first time and then you try again maybe in September and it still doesn’t fruit and you give it until the following spring it still doesn’t fruit and maybe you got a dud, but hopefully that’s not the case.
How Many Mushrooms will a Mushroom Log Produce?
[00:25:26] Erin Hoover: So, um, how many flushes of mushrooms can you expect to get from the logs?
[00:25:35] Kevin Zobrist: How many flushes of mushrooms? I think you can get two or three flushes per year and roughly doing this May to September. So you’re doing this in the warm season and you want seven to eight weeks of rest between flushes. So you could do your first flush in May, harvest your mushrooms, wait seven to eight weeks, mid-summer, do your second flush, and another seven to eight weeks getting into maybe late September and do a final flush for the year.
And your log should produce for several years, usually about three to five years, um, before things just become too depleted, the log will feel really lightweight as most of that log has been decomposed at that point and log has completed its job and time to make new ones.
[00:26:33] Erin Hoover: So is there a way to take the mycelium from the spent logs and inoculate new logs?
[00:26:43] Kevin Zobrist: Uh, there’s not really a, a readily viable way to do that. Uh, it would be far easier to just do it and more reliable to do a fresh inoculation with your sawdust spawn. And the spawn is so cheap, there’s really no advantage of trying to recycle your mycelium.
[00:27:03] Erin Hoover: So do you have any creative suggestions on what to do with the spent logs?
[00:27:08] Kevin Zobrist: What to do with the spent logs? Uh, compost or toss them in the woods to just, uh, naturally finish their decomposition process. I put mine in the compost bin.
Common Challenges of Growing Shiitake Mushrooms
[00:27:20] Erin Hoover: Okay. So, what are some of the more common challenges that growers experience with Shiitakes?
[00:27:27] Kevin Zobrist: Back to my three key ingredients of time, water, and patience.
[00:28:00] It’s the lack of one of those. I think one of the biggest challenges is that people, they go stack their logs, maybe they have, you know, a little wooded area of their, their property. That’s why we do this so much with small woodland owners because they have wooded areas and kind of forested shaded environment is just perfect environment for having these logs be shaded, but have access to natural moisture, but people will put them on the north side of their house or some forgotten shaded corner of their property, and then they forget about them, and maybe they didn’t do that soaking in June or July.
Also didn’t, you know, check on them, water them down occasionally if they didn’t bother to soak them, that type of thing, and the logs dry out. So forgetting about it and letting them dry out, I think that’s the, the biggest source of problems. Not waiting long enough for the spawn and then the pests. I, one year I’ve had a nice three logs that were nicely fruiting and I was, they were just about ready for harvest.
[00:29:00] It’s like, okay, tomorrow I’m going to come out and I’m going to harvest those mushrooms. I come out the next day. And all of the mushrooms are gone and all that’s left is a bunch of slug slime trails and I traced it to this one itty bitty slug and it boggles my mind. It’s like, where did it put all of them?
Where does it stick? All the biomass from those mushrooms? The slug just wasn’t big enough to hold all that. But slugs were my worst enemy when trying to grow them. But the techniques that we’ve developed at WSU to wrap these things tightly in the remake fabric. That’s made a huge difference. That’s been a game changer as far as keeping the pests out and protecting your mushrooms.
[00:29:30] Erin Hoover: So is there a way to deal with if your lawn does get contaminated with some of the local, uh, fungus?
[00:29:38] Kevin Zobrist: If you’re doing it properly, that’s unlikely to happen, but I would always advise that when you see mushrooms pop out, make sure you’re getting the right thing, you know, compare it to the, the photo, if it looks very different than a Shiitake.
[00:30:00] Then, uh, you might have gotten some cross-contamination in there, and usually it’s going to be one species of fungus that dominates, so one’s going to out compete the other. You’re probably not typically going to get a mix, although I have heard anecdotally that someone got Shiitake and some turkey tail on, on one log, but typically it’s, it’s either going to be Shiitake or it’s going to be something else.
If it never fruits with Shiitake or fruits with something other than Shiitake, then you didn’t get what you were hoping for. So I have never had that happen. I’ve always very reliably gotten Shiitake by drilling all those holes and stuffing all that mycelium well distributed into the interior of the log.
That’s giving it a super high advantage. I think where you would have a higher risk is if you tried to use like went out the end of the winter and just found natural deadfall or dead tree or logs that have been on [00:31:00] the on the ground for a few months. Those are where it. What are likely already contaminated with something else.
So you’re just, even though you’re sticking the Shiitake in there, it’s too late to the game, uh, that something else is already in there and we’ll outcompete the Shiitake. But if you’re using fresh logs. and doing good inoculation procedures, it’s very unlikely. But again, always compare what you’re getting to the photo, make sure you’re getting the right thing.
And if you haven’t eaten Shiitake before, you might want to start by having a small piece of one. You know, some people can have allergic reactions just to certain fungi. Uh, so if you haven’t had those before, you can even start with ones from the grocery store just to make sure you don’t have a reaction.
[00:32:00] We also recommend that you always cook your mushrooms. There are natural compounds in mushrooms, some of them can have carcinogenic properties to them. They’re not a huge risk, but any potentially harmful chemicals will break down during the cooking process. Unlike with some vegetables, cooking is not going to diminish the nutritional value of the mushroom.
And hey, cooking up a fresh batch of Shiitake with butter and garlic, there’s just nothing better.
Strategies for Improving Shiitake Mushroom Production
[00:32:24] Erin Hoover: That sounds really good. If you don’t get the amount of fruiting that you expect, is there a way, do you wait longer between your next flush, or is there a way to try to improve that production?
[00:32:36] Kevin Zobrist: I don’t know that there’s necessarily a way to improve production of fungi or mysterious organisms.
[00:33:00] And sometimes you get a log that’s a real winner and sometimes you get a log that may not produce as much. If it’s producing at all, you’ve probably waited long enough. You know, maybe you give it, let’s say you fruit in May, you didn’t get as much. As you, you thought you might, you know, only a few mushrooms on that long log, well, maybe don’t just give it seven to eight weeks until your next attempt, maybe give it, go through two cycles and wait for September, give it a longer rest period, and then just make sure that you’re keeping that moist again, time, water, and patience.
Resources for Mushroom Hobbyists
[00:33:28] Erin Hoover: Where can listeners learn more? You said you’ve got a lot of resources for hobbyists.
[00:33:34] Kevin Zobrist: Yes, we do. So WSU has developed a website. It’s the Pacific Northwest Forest Cultivated Mushroom Growers website, and that is that www.pnwforestmushroomgrowers.net. Or you can just do an internet search for PNW forest cultivated mushroom growers.
Okay. And that should get [00:34:00] you there. We have all sorts of things that you can download and print out guides. We also have for people who want to do this as a small enterprise. Maybe it’s someone who runs a small farm, sells at farmers markets or farm stands and wants to diversify their products to incorporate a new product of mushrooms.
We have enterprise budgets and planning tools in there as well, as well as YouTube videos on how to do these processes and fact sheets, publications, things you can download and print as guides for your drilling and all sorts of resources there. That’s really. Just a treasure trove of resources for people who want to start doing this.
Final Thoughts on Growing Shiitake Mushrooms
[00:34:45] Erin Hoover: All right, well, and I will put a link to that in the show notes so that listeners can find that. And as well as links to your podcast, The Forest Overstory. Is there anything else that you’d like to add about growing Shiitakes?
[00:34:59] Kevin Zobrist: Find some great mushroom soup recipes in anticipation.
[00:35:03] Erin Hoover: That sounds good.
Well, thanks for joining me today, Kevin. This was fun.
[00:35:07] Kevin Zobrist: Oh, it’s my pleasure.
[00:35:08] Erin Hoover: Thank you for joining us on this episode of The Evergreen Thumb, brought to you by the WSU Extension Master Gardener Program Volunteers. And sponsored by the Master Gardener Foundation of Washington State. We hope that today’s discussion has inspired and equipped you with valuable insights to nurture your garden.
The Master Gardener Foundation of Washington State is a nonprofit organization whose primary purpose is to provide unifying support and advocacy. For WSU Extension Master Gardener programs throughout Washington State. To support the Master Gardener Foundation of Washington State, visit www.mastergardenerfoundation.org/donate.
[00:36:00] Whether you’re an experienced Master Gardener or just starting out, the WSU Extension Master Gardener program is here to support you every step of the way. WSU Extension Master Gardeners empower and sustain diverse communities with relevant, unbiased, research-based horticulture education.
Reach out to your local WSU Extension office to connect with master gardeners and tap into a wealth of resources that can help you achieve gardening success. To learn more about the program or how to become a master gardener, visit www.mastergardener.wsu.edu/get-involved.
If you enjoyed today’s episode and want to stay connected with us, be sure to subscribe to future episodes filled with expert tips, fascinating stories, and practical advice.
[00:37:00] Don’t forget to leave a review and share it with fellow gardeners to spread the joy of gardening.
Questions or comments to be addressed in future episodes can be sent to hello@theevergreenthumb.com. The views, thoughts, and opinions expressed by guests of this podcast are their own and do not imply endorsement by Washington State University or the Master Gardener Foundation of Washington State.